Wednesday, January 18, 2012

The Un-bored Iron Board Cover

 This project is a long time coming, my old cover was a white with cats on it and very stained, now cats are alright but not in my decor.  I actually disposed of it awhile ago,  I've been planning on making a new one for ages now just never got around to it.  Well no time like the present, no more towels on top of my iron board.  I'm glad it turned out because well I kinda winged it.

First I layed my fabric and iron board face down, measured 3 inches all the way around the board and cut it out
 Set your sewing machine on a zig zag stitch, take a length of elastic mine was about 2 1/2 yards but I ended up trimming it later.  Now begin sewing the elastic around the outside edge of the fabric being sure to keep the elastic stretched while sewing. 

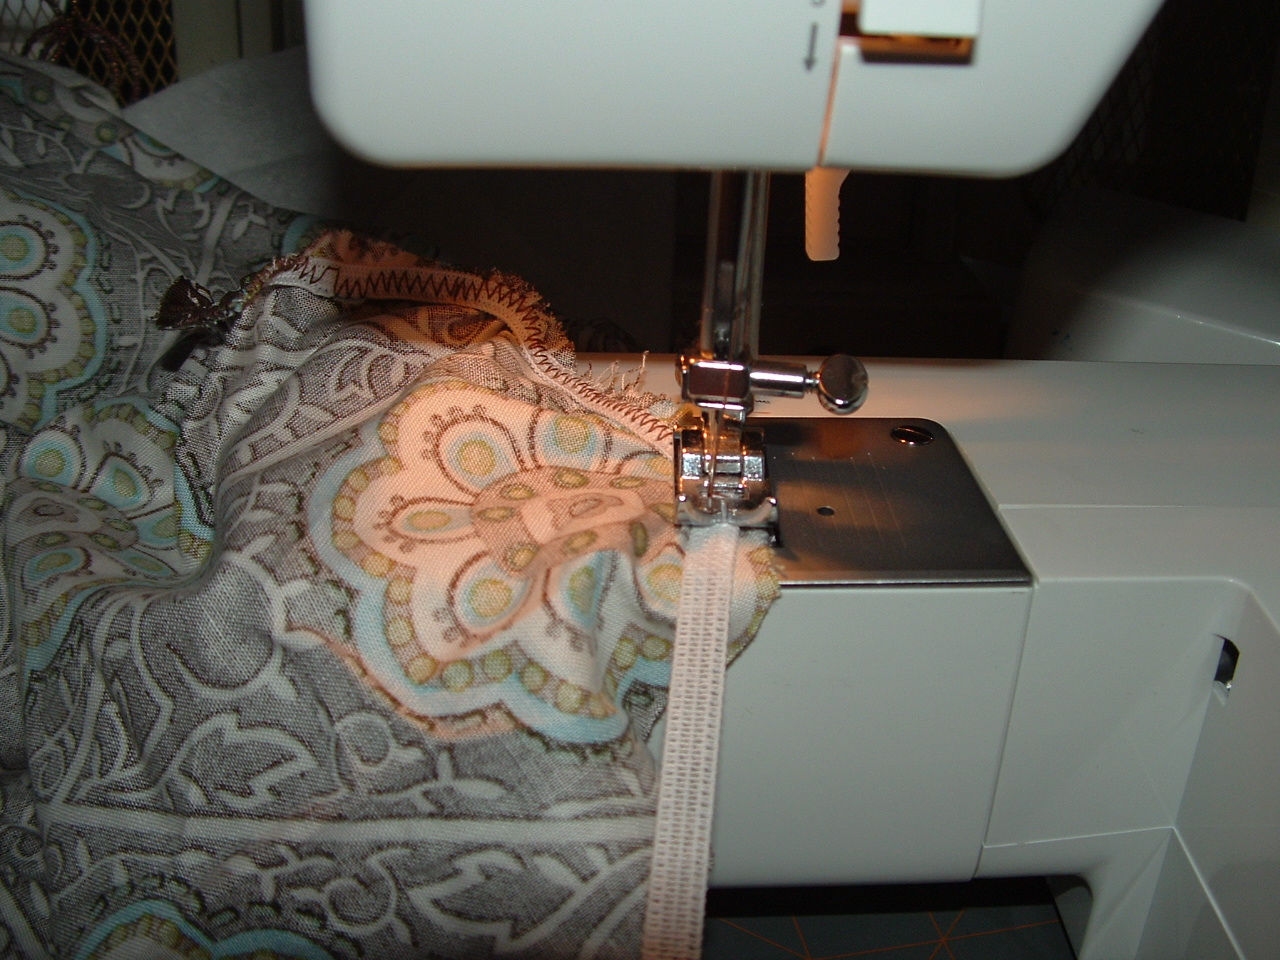
 Sew the elastic all the way around, overlapping slightly at the end.  Trim the access elastic.

 Spritz the elastic and run a warm iron over it.
 I still had the padding for in between the board and the cover, so I just reused that.  Though I'm sure you could use any kind of heat friendly quilting batting, insul-brite would work well to help reflect the heat back up.
 There was a little sliding so I just added a stretch of elastic across the ends about 4-5 inches from the ends.
 My finished project, I love it.  The perfect addition my craft room.  Expect to see this and coordinating fabrics to show up in future decor projects for my craft room!!!
A trial run on a special project, more on that later.
All these organization project, taking time to sew felt great.  I love the new Singer Brandon got me for Christmas, Thank You Baby!!!!!!!!  Also excited to share that I'm fostering an industrial leather machine, pending adoption depending on how she runs!!!!

Wednesday, January 11, 2012

A Step Above the Rest

As I have previously mentioned my New Years Resolution is to get my craft room organized.  This includes finding a solution to keep my spools of thread and bobbins in check.  Those little sucker are always getting away from me, it keeps the cat amused but is a pain when I can't find the thread I need.  It was time for a spool holder.

After much shopping around, I couldn't find exactly what I wanted.  There are many options but I was looking for something to keep both the thread and matching bobbin together, a lot appeared as if they would be easily tipped over, and frankly even though they were on sale they were still quite pricey.  Especially since I when I can make it myself at a much lower price.

I started by running to the hardware store and grabbing a 1x3x6 and two 3/16 wooden dowel.


Gathered up my supplies; drop cloth, hack saw, miter box, screws, drill, ruler and safety goggles.


Use the ruler to find the center of your two halves.  Next don the safety glass, use the hacksaw and miter box to cut the pieces in half again.


What you are left with is four 18 inch pieces of wood. 

Now what you are going to do is butt the 1 inch edge of one piece of wood against the 3 inch edge of the other creating a 90 degree angle.
Go ahead and pre-drill the holes for your screws to prevent the wood from splitting.  I then used a drill bit slightly larger than the head of my drill to counter sink the screw, I had big plans on fill it with wood putty for a nice finished look however darn wood putty is dry so that's a project for an other day.
 Secure with a screw at each end.
You're going to add another piece of wood creating a zig zag or "step."

Pre-drill, counter sink, and secure with a screw at each end.  Use the same technique to add the last piece of wood towards the back as a leg.
 
It's time to cut your dowel.  You're going to want to customize this to your needs.  I went and found my tallest spool of thread, placed it on the dowel, and stacked a bobbin on top.  Place next to a ruler.

 I knew that I wanted to sink the dowel into the "steps" a half of a inch, so I took that into account and cut the dowels into 3 1/2 pieces.  I cut 20 pieces, 10 for the top row and 10 for the bottom row.
I placed a rubber band but you can also use tape to mark 1/2 inch on the drill bit I'm going to be using.

Now mark 1 inch in on both sides and levels.  Then ever 4 1/2 cm between the first 4 marks.  Drill using 5/32 drill bit, pre-marked at 1/2 depth.  You'll have 20 evenly spaced holes.


 Now simply use a hammer to pound in your precut dowels.  I didn't glue them, the dowel seemed sturdy enough where I felt comfortable doing without but it's a personal call.

You're done, place your spools and bobbins on rack and there you have it.
 Finish Project for a grand total of $6.65 plus tax.

We've only just began, this is only the sewing corner of my craft room!!!!

Momma's little helper re-hydrating, supervising is hard work!!!!

 Hope you enjoy this project!!!!


Thursday, January 5, 2012

Turkey Enchiladas

I have been craving enchiladas, normally I would brown up some ground turkey and utilize a kit.  This was a no go as I couldn't find the one I normally use.  So I went on the hunt to find the perfect enchilada recipe but nothing was quite right in my head.  I couldn't image the favor and taste blending into anything edible.  So I did my own "mash up" of recipes and I was quite pleased with the results.

This recipe consist of three parts; a bed of salsa favored rice, the enchiladas, and the sauce. 

  Ingredients

Rice:
  • 1 1/2 cups minute rice
  • 1 1/2 cups water
  • 1/2 mild salsa
  • 1/4 cup frozen corn defrosted

Sauce
  • 3 tablespoons olive oil
  • 1 tablespoon flour
  • 1/4 cup chili powder
  • 2 cups chicken or turkey stock
  • 6 oz. can tomato paste
  • 1 teaspoon oregano
  • 1 teaspoon cumin
  • Dash of salt
  • Pepper to taste
  • 1 tablespoon sugar

Enchiladas
  • 1 lb. ground turkey
  • 3 tablespoon chili powder
  • 1/2 cup mild salsa
  • 1 small diced onion
  • 1 teaspoon minced garlic
  • 1 tablespoon olive oil
  • 1/2 cup water
  • 1/4 frozen corn defrosted
Directions:
  1. Preheat oven to 350 degrees
  2. Rice:  Bring water to a boil, remove from heat, add rice and cover.  After allowing rice to absorb water and fluff mix in salsa and rice.  Smooth allow the bottom of a 8 x 5 baking pan creating a bed of rice.                                                                                                         
  3. Sauce: Begin by heating oil in sauce pan, add in flour frequently stirring, allow to brown but be careful not to scorch.  Fold in chili powder and allow mixture to brown a minute or two longer, it will become paste like.  Slowly pour in chicken stock, allow to warm and spoon in the tomato paste, whisk together until ingredients are fully dissolved.  Add spices then bring to a boil, reduce heat and simmer for 15 minutes, stir occasionally.
  4. Enchilada filling: Heat olive oil in skillet, saute onion and minced garlic.  Add turkey and cook until browned.  Pour in water and mix in chili powder.   Mix in corn and salsa.  Set mixture aside.

 Excute:


Lay out 8 flour tortillas on clean surface
Spoon in approx. 3 tbs filling down center of tortillas

Carefully roll enchilada

.
Place onto rice bed opening down
Line rolls across pan
Spoon on sauce and completely cover enchiladas
Cover top with cheese


.

.
Bake for 20 minutes or until cheese completely melted


Let stand for 5 to 10 minutes

Serve and enjoy!!!!
It's mommy tested and Syd approved!!!!  Turned out very yummy!!!!!


Sunday, January 1, 2012

Resolutions

Happy New Years!!!!!!!!!!!  Hope everyone brought the New Years in with a big bang!!!  As always the New Year has me thinking of resolutions and the many possibilities they bring.  First thing first is of course my attempt at a craft blog and I’m looking forward to putting together my first tutorial, anticipation…………….  Decisions decisions what will it be?  Patients is a virtue and we all know I have patients, bum bum bump, okay so I’m a little lame.  

Before I can start anything I need to embark on the journey of becoming organized.  I’ve been blessed with my own crafting area, it had nothing to do with my supplies overtaking the apartment and keeping hazards from a small mobilized person.  None the less it’s my very own space to do as I please.   I must admit shame to the mess that it has become; it’s nothing short of an unloading zone at the moment.
 
I have an amazing fabric stash that seems to keep growing and growing.  This seems like the first logical step in executing my resolution.   I managed to get a bit of a head start with this one, but then life with a toddler kicked in and multiple projects that Santa needed a hand with over the holiday season.  Since I love to share my finished projects, here's a few of my favorites:

Chef Set
Vintage Style Nightgown
Rag Dolls and Rattle Dolls


While surfing the web for a solution to the stash problem I came across this wonderfully ingenious tutorial http://justsomethingimade.com/2009/07/organizing-fabric-remnants/ and got to work.....................

Supplies
Cleared a large area in my living room and laid out piece by piece,  took my trusty old yard stick and began measuring.  Fold, roll, bind, and tape there really isn't much more to it then that.
It is a very time consuming and monotonousness project.

more and........
more fabric....
The end results well worth it, wouldn't you say?!?!?


Did she say the end?  Not even close.............  She's crafty might just be a more elegant way of saying she's a hoarder.  My lovely grandma loves to feed into my addiction and often picks up fabric at the church sales she frequents, with more than a few good finds and at a steal of a price at that.  Add that to fabric sales and thifting, my stash is overflowing.  In there lays the need for further organization and storage.  Fortunately I have a few ideas up my sleeves, can't wait to share.

Anyways back to the resolution deal, because you just can't have one.  Like many of us I have a few extra pounds I can shed around my waist, I don't do diets, though really should work on less snacking and adding healthier foods to the menu, a slightly more active lifestyle wouldn't hurt either.  The romance department while not lacking could use a little more time dedicated to it, I'm thinking maybe date night at least once a month.  And last but not least make time for my besties Jass and Leslie.  If only there was more time in the day, this would all be a piece of cake!!!  So in retrospect, my resolutions work on organization and time management.

Once more Happy New Years to you and yours!!!!!  I wish everyone many blessing this year, and hope 2012 brings great things!!!!  We're off to start the year off right with great friends and family with the years first of many Fun Day Sundays at the Orrs!!!!